


How to add Custom Fields to the WooCommerce Product Page
There are several high quality free plugins for creating WooCommerce custom fields. I recommend Advanced Custom Fields and Toolset Types.
Install and Activate Advanced Custom Fields plugin.
- Click the ‘Custom Fields’ link on the left of the WordPress admin.
- Click the option to add a new Field Group. A Field Group is a collection of custom fields and helps to keep them organized in the back end. You need to create a Field Group even if you only need to add 1 custom field.
-
- This will take you to a screen called ‘Add New Field Group’:
- First, add a name for the Field Group. This is just to help you organize the WooCommerce custom fields.
- Location – Select Show this field group if Post Type is equal to Product. This will show the custom field for WooCommerce products instead of other post types.
- Press the blue ‘Add Field’ button. Next, you need to add the actual custom fields for your products.
- Add a Label for the custom field. This will just appear in the back end of your website.
- Type a lowercase Name for the custom field. You’ll use this to show the custom field on WooCommerce product page.
- Choose a Field Type from the list.
- Select any other options and then click Publish.
- Repeat the ‘Add Field’ process to add any more product custom fields.
That’s how to create one or more custom fields to be displayed on the WooCommerce product page.
- This will take you to a screen called ‘Add New Field Group’:
Add a custom field value for each product
- Click the ‘Products’ link on the left of the WordPress admin.
- Next, click on the product for which you want to add a custom field value.
- Scroll down on the ‘Edit Product’ screen until you see the custom field.
- Enter a custom field value and Update the product.
- Repeat Steps 1-4 for all the products that need a custom field value.
Method 2 add Custom Fields to the WooCommerce Product Page
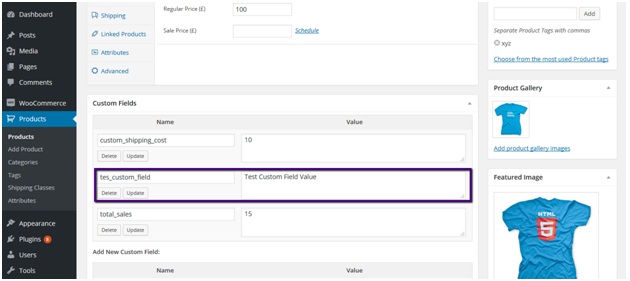
first of all we need to add a custom field to a product. To do this go to admin panel of your site, navigate to products and click on a product to edit it. Alternatively you can add a new product as well.
So, on the product screen add a custom field.Enter the name and value text of your choice and click on Add Custom Field button.After adding the custom field it will be listed under custom fields:
Save the changes by clicking on Update button.Now, if you’ll go to product page you’ll not see custom field value there yet.
Now, we are going to display custom field value on product page.To do this go to plugins section, find the Woocommerce plugin and click on edit link under it.
From the editor click find content-single-product.php file and add the following line of code at appropriate place.
<?php echo get_post_meta( get_the_ID(), ‘tes_custom_field’, true ); ?>
Replace the custom field name with your custom field name and save the file by clicking on update file button.Now, if you’ll go to product page again you’ll see custom field value being displayed there.


